Strawberry Tartelettes

IMG_1561

After a couple of days away from the kitchen today I decided to bake some strawberry tartelettes. Condensed milk and strawberries… You can’t go wrong with it!

They looked amazing and tasted really good but SO sweet… diabetes alert!!!


Strawberry Tartelettes (9 doses)

Dough:

  • 150 g of flour
  • 75 g of butter
  • 50 g of sugar
  • 2 egg yolks

Filling:

  • 1 can of condensed milk
  • 2 tbsp of lemon juice
  • 200 g of strawberries
  • 100 g of sugar
  1. Pre-heat the oven at 180ºC.
  2. Pour the flour in a bowl. Open a cavity in the centre and put the sugar and melted butter in it. Mix well until you get a sandy mixture.IMG_1485
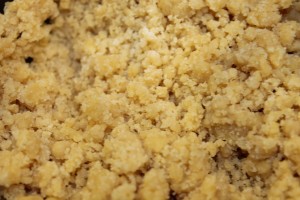
  3. Add the egg yolks to the dough. Mix well, using your hands if needed. Divide the dough into nine pieces.
  4. Grease nine 7 cm tartelette tins. Cover each tin with one part of the dough, pressing well against the bottom and sides of the tin. Make sure the dough on the side of the tin is regular and thick enough not to break after cooking.
  5. Cook in the oven for approximately 20 minutes or until the dough is golden and cooked.
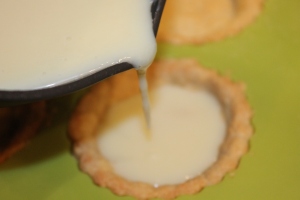
  6. In a pan mix the condensed milk with the lemon juice and cook in low fire for approximately 15 minutes, stirring constantly.
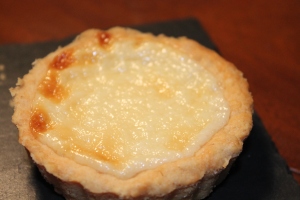
  7. After the tartelettes are cooked, remove them from the oven and fill them with the condensed milk mixture.IMG_1509
  8. Put in the oven again and let it cook for approximately 15 minutes, until the condensed milk is cooked and golden.IMG_1521
  9. Meanwhile, wash 150 g of strawberries, remove the hulls, and slice them. In a pan, cook the sliced strawberries with the sugar for approximately 15 – 20 minutes. The strawberries will get soft and turn into jam. Let it boil in low fire, stirring, in order to get some consistency.IMG_1527
  10. Pour the jam on top of the tartelettes and let it cool.IMG_1538
  11. Decorate with the remaining fresh strawberries.IMG_1540

Spinach & Cheese Crêpes

IMG_1013My sister is a bit of a fussy eater and, as years went by, she developed a taste for more healthy food. This is something very odd in my family… Being Portuguese we typically love our meat and rich sauces.

Surprisingly, my mom adjusted a bit to these tastes and started cooking a vast range of vegetarian food. This dish is inspired on one of my mom’s dishes.


Spinach and Cheese Crêpes (serves 4)

  • 100 g of flour
  • 1 cup of milk
  • 1 tbsp of butter
  • 1 egg
  • butter
  • 2 garlic cloves
  • 4 tbsp of olive oil
  • 500 g of spinach baby leaves
  • 300 g of cottage cheese (in Portugal use requeijão)
  • 100 g of walnuts
  • salt and pepper
  1. In a bowl mix the flour with the milk, the melted butter and the egg. Make sure the dough is smooth by using the food processor, if needed.
  2. Grease a 20 cm non-stick frying pan with a small portion of butter. Heat the frying pan in medium fire and, after approximately 30 seconds, pour one ladle of dough on the frying pan. Make sure the dough covers the bottom of the frying pan by gently swirling the frying pan. The dough will immediately start to cook covering the base of the pan.IMG_0938
  3.  Let it cook until the crêpe separates from the frying pan when you swirl it gently. The base of the crêpe will look cooked with some golden bits. Flip the crêpe around and let it cook until the two sides of the crêpe are completely cooked.IMG_0944
  4. Repeat until you are out of dough. Place each crêpe in its serving plate.
  5. Peel and slice the garlic clove. In a frying pan cook the garlic with the olive oil in low fire. IMG_0964
  6. When the garlic becomes golden, add the washed spinach baby leaves. Season with salt and pepper. Stir gently making sure the spinach cooks evenly. They will become darker and tender.IMG_0972
  7. Place the cooked spinach in a bowl. Discard any excess grease left on the frying pan.
  8. Add the cottage cheese and the slightly broken walnuts to the spinach. Season and mix well. Save some walnuts and cottage cheese to decorate.IMG_0994
  9. Fill the center part of the crêpes with the spinach and cheese mixture. Close the crêpes by folding first one side in and then the other. Decorate with some cottage cheese and walnuts.

Colourful Meringues

IMG_1314I’ve been feeling like baking one of those colourful cakes for days, but we still have some lemon cake left… So, decided to play a bit with my food colouring and made some nice meringue cakes.

It was my first go with meringue cakes so tried a couple of sizes. The smaller ones were a bit harder and crunchy, while the larger ones were softer and a bit more chewy inside. Loved both of them!


Colourful Meringues (serves 16)

  • 4 egg whites
  • 115 g of caster sugar
  • 75 g of icing sugar
  • 1/2 tea spoon of lemon juice
  • Food colouring
  1. Pre-heat the oven at 110ºC.
  2. Pour the egg whites on a glass or metal large bowl. Add the lemon juice. Whisk well until you get a thick and fluffy mixture that stands up stiff when you remove the whisker. I would advise you to use an electric whisk on medium velocity to do this.IMG_1190
  3. Add the caster sugar slowly, one spoon at a time, whisking well between each addition. In this step you should use the electric whisk on maximum velocity. You will get a thick and glossy mixture.IMG_1202
  4. Sift the icing sugar and add it to the mixture progressively, in three or four parts. Mix gently, being careful not to whisk it again. The objective is to fold the icing sugar into the mixture.
  5. Separate the mixture into as many bowls as the colours you are planing to use.
  6. Add a small quantity of food colouring to each bowl. I used paste food colouring which is quite concentrated, so I only had to dip a small skewer inside the paste and then on the mixture. Fold in gently to mix the food colouring.IMG_1273
  7. Grease a tray with butter. You can make the meringues with the help of two spoons or with a piping bag.
  8. If using a piping bag, choose a large star nozzle and fill the bag with one of the colour mixtures. Pipe the meringue into small swirls onto the tray, leaving around 1 cm apart between them.IMG_1264
  9. Bake for 1 hour to 1 hour and a half. To check if the meringues are cooked, tap gently the bottom of the tray and see if the meringues immediately release from the tray.
  10. Let the meringues cool on a cooling rack. You can save them in a dry place for a couple of weeks if you wish.IMG_1322

Lemon and Thyme Chicken

IMG_1169Autumn is definitely here…  It’s rainy and windy and, since I can’t change the weather, decided to embrace it!

So, I turned on the oven and cooked some chicken. It’s a very easy dish that you can prepare in 5 to 10 minutes and just pop it in the oven for a couple of hours. I cooked it quite slowly and let the heat and smell fill the house… It felt so good!


Lemon and Thyme Chicken (serves 4)

  • 4 chicken legs
  • 4 chicken tights
  • 1 or 2 lemons juice
  • 2 cloves of garlic
  • 1 tbsp of dry thyme
  • 2 thin slices of onion
  • salt and pepper
  1. Pre-heat the oven at 175ºC.
  2. Peel the chicken and remove the extra fat that usually remains near the skin.
  3. Place the chicken in an oven tray.IMG_1114
  4. Pour the lemon juice on top of the chicken. You should get an abundant amount of juice since no other liquids will be added to the chicken and you are supposed to get a nice sauce after cooking.IMG_1122
  5. Slice the garlic and spread it evenly on top of the chicken.
  6. Season with salt and pepper. Mix in order for the seasoning to spread on the lemon juice.
  7. Sprinkle with the thyme and the onion.IMG_1135
  8. Cook for about 1 hour and a half to 2 hours until the chicken is completely cooked and golden. During the cooking time you should turn the chicken pieces so they get cooked evenly and irrigate the meat at least twice with the resulting lemon sauce.IMG_1140
  9. Serve the chicken covered with the lemon sauce and some fries.

Portuguese Milk Cream

IMG_0910This is a typical dessert in Portugal called Leite Creme (Milk Cream), which has many resemblances to the French crème brûlée, using milk instead of cream, which makes it a bit more diet friendly.

You can have it plain or topped with some caramel crusty layer. This is my favourite part! The caramel crust should break under the pressure of your spoon and will mix with the creamy softness of the sweet in your mouth… Yummy!

In Portugal we use Maizena flour to cook it. It’s a cornstarch flour that gives it a more velvety consistency. Since I couldn’t find it in Bristol, I used regular flour. It’s not exactly the same but it was still good enough!


Milk Cream (serves 10)

  • 7 egg yolks
  • 2 tbsp of Maizena flour or 3 tbsp of regular flour
  • 150 g of sugar
  • 1 l of milk
  • 3 pieces of lemon peel
  • sugar to decorate
  1. In a pan mix the egg yolks with the flour. Mix well until all the flour is dissolved and you should get a fluffy orange dough. If needed, smooth it with the food processor.IMG_0862
  2. Add the sugar and mix well.IMG_0866
  3. Add the milk slowly, stirring well.
  4. Finally, add the lemon peel.IMG_0872
  5. Cook in low fire, stirring always, until it starts boiling. The dough will start bubbling.
  6. Turn the fire off and pour the mixture into small bowls, a tray, or ramekins.IMG_0886
  7. Let it cool and, before serving, lay a bit of sugar (1 tea spoon) on top of each bowl and burn it with a chef torch until it caramelise. You will get a tough layer of caramel on top of each bowl.IMG_0909