Meat on a Stick

IMG_5504BBQs are quite frequent in Portugal, especially during Summer. A very typical thing to have on a Saturday afternoon is espetadas. It’s basically meat and a couple of vegetables on a stick but it’s quite different from kebab in terms of taste.

In Portugal you can buy espetadas in most supermarkets but the homemade ones are so much better!

This is an easy and tasty summer dish, which is a bit different from what you traditionally find in a British BBQ, but I think you will enjoy it.


Meat on a Stick (serves 3)
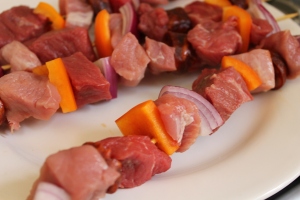
  • 250 g of diced pork
  • 250 g of diced cow
  • 1/2 orange pepper (you can use any other type)
  • 1/2 onion
  • 1/4 chourizo
  • salt, pepper and powder garlic
  1. Try to buy a tender meat. For the pork I bought some pork fillet and diced it myself.IMG_5335
  2. Wash the pepper and remove all the seeds. Cut the pepper into pieces of around 3cm x 3cm (1”x1”).
  3. Cut the onion in three pieces and them in halves.IMG_5337
  4. Slice the chorizo in thick slices.
  5. Using a long skewer start filling it with the several ingredients. This amount will be enough for at least 6 skewers. I typically start and finish with either the pepper or the onion because the top and end tend to get a bit more burnt in the BBQ. Even if you don’t eat the pepper or the onion it will give a very tasty flavour to the adjacent meat.IMG_5355
  6. Season the meat sticks with salt, peppers and powder garlic.IMG_5406
  7. Grill in low fire rotating frequently in order to assure that the meat is cooked evenly. You can also cook them on an electric grill (as I did) or on a grill pan. IMG_5455
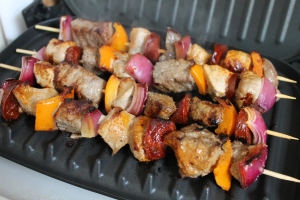
  8. Serve directly on the skewer with fries and a nice salad.

Lemon Sponge Cake

IMG_6018My husband (being married for only three weeks it still feels funny to say it…) has been craving for some simple cake.

Decided to surprise him yesterday with a lemon sponge cake. It’s a simple cake that you can cook easily and with a few number of ingredients but it still tastes great. I had mine with lemon curd and a sprinkle of icing sugar!


Lemon Sponge Cake

  • 250 g of butter
  • 250 g of sugar
  • 4 eggs
  • 250 g of self raising flour
  • 1 lemon juice and zest
  1. Heat the oven to 180ºC.
  2. Mix the butter with the sugar until pale. You can leave the butter out of the fridge for a couple of hours and use it when it is soft or you can simp ly melt it. Add the eggs and mix well.IMG_5832
  3. Sift over the flour gradually and mix well between additions. You will get a thick dough. Add the lemon zest and juice and mix well.IMG_5836
  4. Grease a cake tin with some butter and sprinkle with flour making sure the inside of the tin is completely covered. Remove the excess flour by gently shaking the tin cake turned down into the sink.
  5. Put the dough inside the tin and spread it evenly with a spatula. Bake for 45 minutes until a skewer inserted into it comes out clean (with no dough attached).
  6. Let it cool within the bake tin for 5 minutes and, after that, turn it on to a wire rack to cool. IMG_5899
  7. Serve simple or with lemon curd, whipped cream or ice cream.

Melon Ice Cream

IMG_5515

The last couple of days have been a mix of sun and proper rain and thunders. Crazy weather…

Nevertheless, I still feel like summer and refuse to let it go just yet! Therefore, here is my summery recipe of melon ice cream.


Melon Ice Cream (around 1 liter)

  • 500 g melon
  • 1/2 can of condensed milk
  • 1 egg
  • 150 ml double cream
  • 2 tbsp of sugar (optional)
  1. Choose a small ripe melon. This will assure that your ice cream will be sweeter. I’m not an expert on choosing melons but some tips I’ve been taught are: (1) smell it because, as some type of melons get ripe, they tend to have a stronger smell; and/or (2) press its base gently to check if it is soft (ripe) or hard (unripe).IMG_5066
  2. Peel the melon and cut it into pieces. In a blender turn it into a pulp. IMG_5239
  3. In a bowl mix the melon pulp with the condensed milk and the egg. IMG_5243
  4. Whisk the cream into a thick whipped cream. In case the melon isn’t very sweet you may add the sugar to the cream.
  5. Mix the cream with the remaining mixture.
  6. Put the ice cream mixture into a tupperware suitable for frizzing and place it in the freezer.  You can also use a bowl covered with aluminum foil or an ice cream machine if you have one.IMG_5254
  7. To avoid ice crystals in the ice cream give it a good whisk every hour during the freezing period. It will be ready to serve once it freezes.IMG_5517


Creamy Pasta with Pancetta and Mushrooms

IMG_5220I promise I will refrain from posting more pasta dishes in the next weeks…

I saw this pasta packet while I was in line for boarding in Rome  and it looked so good…

It’s called cavatelli and its made of durum wheat semolina. Did some reading on it and, apparently, it is a product from Sicily and southern Italy and its shape is good to hold thick sauces.


Creamy Cavatelli with Pancetta and Mushrooms (serves 4)

  • 200 g of pancetta in cubes
  • 2 sticks of fresh rosemary
  • 10 mushrooms
  • 3 tbsp of olive oil
  • 300 g of cavatelli pasta (you can replace it with penne pasta)
  • 150 ml of cream
  • 1 egg
  • 3 full tbsp of grated parmesan cheese
  • 1 tbsp of lemon juice
  • parsley to decorate
  • salt and pepper
  1. Heat a non-stick frying pan for 30 seconds and put the pancetta in it. There is no need to use fat since the pancetta will release its own as it cooks.
  2. Wash the rosemary sticks in hot water, and remove the leaves by running your hand down from the top to the bottom of the stick. By doing so you should get in one hand the leaves and on the other the “clean” sticks. Add the rosemary to the pancetta. Let it cook in medium fire.IMG_5092
  3. Wash the mushrooms thoroughly and slice them thinly. When the pancetta is turning a bit more pink, and has released most of its fat, add the mushrooms. And let it cook in low fire. If this mixture gets too dry you can add a couple of olive oil spoons (I used two). IMG_5130
  4. When the mushrooms get soft start cooking the pasta. In pan boil some salted water, add a spoon of olive oil, and cook the past as per the packet instructions (10-12 minutes).IMG_5134
  5. Meanwhile, in a bowl, mix the cream with the egg, 3 tbsp of grated cheese and the lemon juice. Season with pepper. I didn’t add any salt here since the pancetta is already quite salted. IMG_5147
  6. As soon as the pasta is cooked, drain it and add it in the pancetta and mushrooms mixture. Turn the heat off. Stir gently as you slowly add the sauce in order for the sauce to cook slowly and adhere to the pasta. The idea is that the egg in the sauce will cook slowly with the heat from the pasta.IMG_5190
  7. Serve immediately in four plates, sprinkle with grated parmesan cheese and decorate with parsley.

Strawberry and Blueberry Ice Cream

IMG_5264It has been really hot in Bristol! If it wasn’t for my late dissertation I would be enjoying it more…

Being closed in the house working, the only thing left to do to enjoy the summer is having some homemade ice cream! Went with some red fruits on my first trial and was so happy with it that just finished a melon one… still in the freezer but I will be posting the recipe soon.


Strawberry and Blueberry Ice Cream (around 1.5 liters)

  • 1/2 can of condensed milk
  • 2 egg yolks
  • 75 ml of milk
  • 400 g of strawberries
  • 100 g of blueberries
  • 300 ml of double cream
  • 2 tbsp of sugar
  1. In a pan mix the condensed milk with the egg yolks and the milk. Cook in low fire, stirring constantly, until it starts to thicken. Turn the heat off and let it cool.IMG_4986
  2. Wash the strawberries and blueberries. With a blender turn them into a pulp. I used this sauce just like this, since I like to find the seeds and some bits in the ice cream, but you can strain it in order to get a more velvety ice cream.IMG_4997
  3. Whisk the cream and, as it gets stiff, add the sugar and whisk until you get thick whipped cream.
  4. Add the pan mixture to the whipped cream and mix. Subsequently, add the fruit pulp and mix well.IMG_5022
  5. Put the ice cream mixture into a tupperware suitable for frizzing and place it in the freezer.  You can also use a bowl covered with aluminum foil or an ice cream machine if you have one (I’m planning to get one soon!!!).
  6. To avoid ice crystals in the ice cream give it a good whisk every hour during the freezing period. It will be ready to serve once it freezes.IMG_5290

Black Spaghetti

IMG_4963

And the pasta spree continues!

After two weeks out, my dissertation is SO late… And my meeting is just tomorrow… So, I decided to cook something fast. Went with a black spaghetti with prawns and tomatoes. It was really tasty and easy to cook!


Black Spaghetti with Prawns and Tomatoes (serves 4)

  • 350 g of black spaghetti
  • 2 cloves of garlic
  • 1 red chilli
  • 1/2 bunch of parsley
  • 350 g of large king prawns (you can use smaller shrimps)
  • 10 cherry tomatoes
  • 5 tbsp of olive oil
  • fresh oregano (optional)
  • salt and pepper
  1. Chop the garlic cloves into thin slices and the parsley into thin pieces. Save some parsley to decorate.
  2. Open the chilli gently by running a sharp knife on one side and remove the seeds. Cut the chilli in thin slices. You can adjust the amount of chilli used depending on your taste for spicy food. Don’t forget to wash your hands well after touching/cutting the chilli and avoid touching your mouth or eyes before doing so.IMG_4794
  3. In a frying pan heat 4 tbsp of olive oil with the garlic, the shopped parsley and the chilli. Season with salt and pepper. Let it cook in low fire until the garlic starts to get golden. IMG_4815
  4. Add the prawns and continue to cook in low fire. Stir occasionally and let it cook for 10 minutes. After this time add the tomatoes cut in halves and cook for an additional period of 5 minutes.IMG_4897
  5. Meanwhile, in a pan boil some salted water with a spoon of olive oil. I added a bit of fresh oregano to the water but you can do it without it. When the water is boiling add the black spaghetti and cook as mentioned in the packet (usually 8-10 minutes). IMG_4845
  6. Keep stirring the prawns mixture and, in case the sauce start drying, add some of the water from the pasta. Overall, I added around 20 tbsp of water.
  7. When the pasta is boiled, but still al dente, drain it and mix it with the prawns and tomatoes mixture in the frying pan.IMG_4910
  8. Turn the heat off and serve immediately by distributing it evenly through the four plates in which it will be served. Decorate with the saved parsley.IMG_4934

Colourful Fusilli Capri

IMG_4785Rome is truly the paradise of shopping…

My love for food is only matched by my love for shoes and bags! Rome was a constant temptation. However, since I was traveling with hand luggage I had to compromise… Bought two small bags and saved space (and money) for some cool pastas.

Today I’ve tried the giant Fusilli Capri. It was really tasty!

Fusilli Capri (serves 4)

  • 300 g of fusilli capri (you might need to adjust the quantity if using normal fusilli)
  • 30 cherry tomatoes
  • 2 mozzarella cheese balls (250 gr)
  • 1 garlic clove
  • 10 basil leaves
  • a full hand of pine nuts
  • 2 tbsp of olive oil
  • grated parmesan cheese
  • salt and pepper
  1. Use a large pan to boil salted water. Cook the pasta as per the packet instructions (usually around 10 minutes).IMG_4534
  2. Meanwhile, slice the cherry tomatoes in halves, cut the mozzarella cheese balls into cubes, mince the garlic and rip the basil by hand in pieces. Save some basil leaves to decorate.IMG_4604
  3. In a bowl mix the tomato, the mozzarella, the minced garlic and the basil. Season with salt and pepper and sprinkle with the olive oil. Mix gently.IMG_4707
  4. You can use the pine nuts raw but I prefer to toast them. To toast the pine nuts just heat a non stick frying pan, add the pine nuts and cook in a low temperature. Stir frequently in order for the pine nuts to get a uniform golden look.IMG_4689
  5. When the pasta is cooked, but still al dente, drain it and serve immediately.  Put the pasta in the plates it will be served in and add on top the prepared mixture. Sprinkle with  the pine nuts and grated parmesan cheese. Season with fresh ground pepper and decorate with basil leaves.

Two Perfect and Yummi Weeks…

13-07-2013-435After four months of planning… my Wedding day arrived! It was a small event with only family and close friends but it was still a dream day…

The wedding took place in Sintra, Portugal, in the Lawrence’s Hotel. Lord Byron, who used to stay in the Lawrence’s, described Sintra as a “glorious Eden” and I totally subscribe that… Lawrence’s Hotel is the oldest hotel of the Iberian Peninsula (1764) and it’s full of charm and history.

Although it rained and I was terribly late for the wedding, everything went perfectly…

13-07-2013-1IMG_1759

And the food was amazing!!!

  • Leek Cream Soup
  • Browned Salmon with Spinach, Saffron Cream and Chives
  • Pork Loin with Black Plums and Cepes Mushrooms Sauce
  • Small Cheese Cake Pie of Sintra with Lemon Sorbet
  • Lemon and Poppy Seeds Wedding Cake with Chocolate Filling

IMG_1775IMG_1890IMG_1929IMG_1948

13-07-2013-172

After this magic day we were off to Italy!

We started our trip in Venice at Moresco Hotel. It was divine! The city is lovely and so romantic… You find a beautiful canal in every corner!

IMG_2617IMG_2997

Since fresh fish and seafood isn’t easily available in the UK, I tried to eat as much as I could in Venice! Also tried my first gnocchi. It was quite good! You find amazing places by the canals with good and quite affordable food.

IMG_3075IMG_2821

After two days of chilling and kissing in Romantic Venice we departed to Rome!

Rome seems like a city built by giants. You find a historical building, a church or a fountain in every street or square! It’s a majestic city.

IMG_3221IMG_3560

We walked all over Rome until our feet hurt… But it was worth it! Specially loved the Colosseum and St. Peter’s Basilica.

IMG_3305IMG_3985

Here I had some fine fish and seafood rice, pizza and a LOT of ice creams. Ice creams are everywhere and they are amazing! Most of them are made out of organic ingredients and really taste like fruit.

IMG_3505IMG_3530IMG_4477IMG_2720

Another amazing thing in Italy is the coffee. Being Portuguese I love a strong and tasty espresso. In Italy both espresso and cappuccino were really tasty and strong without being overwhelming.

IMG_3649

Definitely recommend Venice and Rome to every food lover!

As a souvenir I brought some pasta and a recipe book. Will be trying some new recipes soon…

Portuguese Clams

IMG_1349Arrived in Portugal to the sad news that the temperature is dropping… to 39ºC!!! After almost 10 months of British weather left me unprepared to such high temperatures. I feel like I’m melting, but it feels so good!

Happy to see my family again and to see my pregnant sister. Felt my nephew kicking for the first time!

As any family gathering in Portugal, we ended up the day having a nice family dinner! Fresh clams with some cold white wine… Yummy!!!


Clams à Bulhão Pato (serves 4 as a starter)

  • 1 kg of fresh clams (you may also use frozen ones in case you don’t find fresh ones easily)
  • 2 garlic cloves
  • 4 tbsp of olive oil
  • 1 to 2 lemons, depending on their size
  • 1 bag of fresh coriander
  • 2 tbsp of white wine (optional)
  • salt
  • 1/2 lemon to decorate
  1. Place the fresh clams in a large bowl covered with water, add some salt, and leave for 3 hours in order for the clams to release any remaining sand they may have. After that time wash them thoroughly and drain all water.
  2. Mince the garlic. In a large pan saute the garlic with the olive oil without letting it burn. Make sure you use a pan that has a cover.IMG_1196
  3. Add the washed clams into the pan. Sprinkle with the lemon juice and the wine (optional) and season with salt. Wash the coriander well and separate it in two. Break one of the halves with your hands in big pieces and add to the clams.
  4. Turn the burner to high, stir well and put the cover on. The sauce will start to simmer and, as the clams start to open, stir well in order to assure that all clams cook and open. The clams will cook in approximately 5 to 10 minutes.IMG_1268
  5. Serve the clams sprinkled with the remaining minced coriander and the half lemon sliced in quarters. IMG_1292

Clams à Bulhão Pato is a traditional Portuguese dish that you can find in most Portuguese beach restaurants during summer time.

Red Berries Cheesecake

IMG_1134Leaving the UK in one day for my wedding in Portugal! Quite excited!!!

Before traveling I always empty the fridge and try to cook everything in it to avoid wasting food. What do I see? Clotted cream, cream cheese and some red berries… a cheesecake is in order!

It was my first cheesecake but it looked nice enough and it tasted amazingly!

Red Berries Cheesecake (serves 8)

  • 1 cup of crushed plain biscuits (Malted milk or Digestive for example)
  • 5 full tbsp of melted butter
  • 2 full tbsp of brown sugar
  • 500g of cream cheese (Philadelphia for example)
  • 300g of clotted cream (can be replaced by thick whisked cream)
  • 8 full tbsp of icing sugar
  • 100 g of blackberries
  • 150 g of raspberries
  • 5 tbsp of sugar
  • Strawberries to decorate
 IMG_0966
  1. In a bowl mix the crushed biscuits with the melted butter and the bown sugar. You should bet a sandy mixture. Depending on the type of biscuits you use you might need to add a bit more of melted butter.
  2. Cover the base of a 20cm (8”) springform cake tin with the biscuits mixture. Press the mixture into the bottom of the tin. You can use a tart pan or even do individual doses into small bowls.
  3. In a bowl mix the cream cheese with the clotted cream and add the icing sugar. IMG_0699
  4. Lay this cream on top of the crushed biscuits. Smooth over with a spatula. The total height of the sweet should be around 4cm (1.5”) now.
  5. Cover the cake tin with some cling film and put it in the fridge.
  6. In a small pan heat the berries with the sugar. Stir and, as the berries soften up, mash them. In case this mixture gets too thick add a bit of water. Wait for it to cool completely. I always prefer to do my own jams but you can also use some bought bottled jam.IMG_0714
  7. After the jam is completely cool, gently put it on top of the cream and reserve in the fridge for at least 5 hours before serving. IMG_1006
  8. Before taking out of the bake tin, pass a knife through the boarders of the tin in order to guarantee that the cheesecake will separate easily from it. Decorate with fanned strawberries.